For those who read Hammy's tutorial and are unable to follow along because they have the newer version of blender. I will not go over what to download or how to export, and this tutorial will seem redundant to those who have read and are able to follow along with Hammy. A link to Hammy's blender tutorial is here:
http://www.feral-heart.com/index.php?option=com_jfusion&Itemid=2&jfile=index.php&topic=11025.0I have colour coded the areas which I will refer back to by their names in order for you to understand better where is what.
When you first open up the newer version of blender, it should look like this
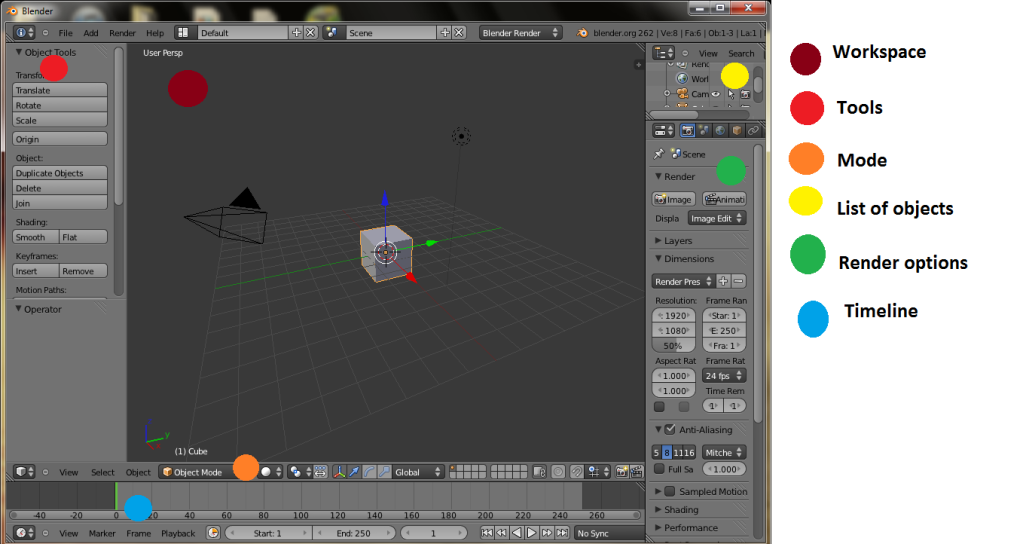 Work space:
 Here is the visual screen where you can view or interact with your object
Tools: Right click your object in object mode to add modifiers, or in edit mode there are helpful tools to manipulate your object. These functions can mostly be replaced by key commands, listed below though.
Mode: This will effect how you view or interact with your object in the work space. Before you can do much with it, you want to change to edit mode.
List of Objects: It says what all you have in your work space. A camera, a lamp, and a cube. Great. Done with that now.
Render Options: Effects how the camera sees your object. This will not change exporting your file for feralheart.
Timeline: If you aren't planning on animating, it will do nothing for you, so try to ignore it. I might add a section on animation later, if anyone is interested.
Helpful Key commands:
Right click- select
Shift + right click- select multiple
alt + right click- select edge loop
b- box select
c- paint select
a- select deselect all
g- grab
x- delete (or x direction
y- y direction
z- z direction
shift+d-duplicate
e-extrude
f-face
s-size
r-rotate
ctrl+r-add edge loop
w-subdivide
shift+p-parent
z-wire frame mode
h-hide
alt+h- undo hide
u-unwrap
n-options
t-enable/disable toolbar
Shift+F1=import object
(Enable numlock to access:)
1-front view
3-right view
7-front view
5- isometric/orthographic toggle
You don't have to remember these, but they are really helpful to refer back to if you need to.
Concepts: (How does Blender actually work?!) Your object is made out of polygons. Specifically shapes with four points. Blender will accept three point shapes, but will not like them. A simple object is one with few polygons, and a complex one will take many polygons, and will take more processing power from feralheart, which is why you want to avoid that. The logical conclusion is that large objects are game heavy and small ones take hardly any effort, but it only matters how many polygons it has. Keep the number down low, but use them as effectively as you can to convey the shape you want.
A polygon is a face, which is made out of lines, which is made out of vertices. This helps to understand selection editing.
When you select a vertices, or a face, or a line, you will see arrows pointing different directions. There are three of them. The blue one, vertical, represents the z direction. The green one is the y directions, and the red, the x direction. Imagine your object is on a 3d graph. Type in x y or z after using the rotate, grab, or extrude command to dictate a direction. Alternatively you can click, hold down, and drag along an arrow direction.
Extruding- When you extrude a face, you essentially create a copy of it, to elongate the feature.
Edge loop/Subdivision- Creating an edge loop adds a full wrap around your object of vertices. Adding a subdivision doubles the amount of edge loops on an object.
Face- select four vertices and press "f" to turn those vertices into a face.
Steps for editing your model: SELECTIONIf you are happy with your starting cube, you can go on, or if want a different shape, right click on it to select it then press "x" to delete it. Look above your work space and tool menu where it says "add." I suggest selecting on of the other basic cylinder or sphere shapes. Hold your middle mouse button down while hovering over your work space. Drag your mouse around, and notice how it changes your view. Get out of the habit of left clicking, that will only move around you 3d cursor. This is like a marker for measuring or placing objects. To start, you need to make sure your object is selected by right clicking on it. Change to edit mode by hitting "tab" or by clicking on the bar below, to select it from the list. You should see that the bar above your timeline changed as you toggled your mode with a new set of buttons, and you tool bar also added a different set of functions. Your cube is outlined in black lines now.
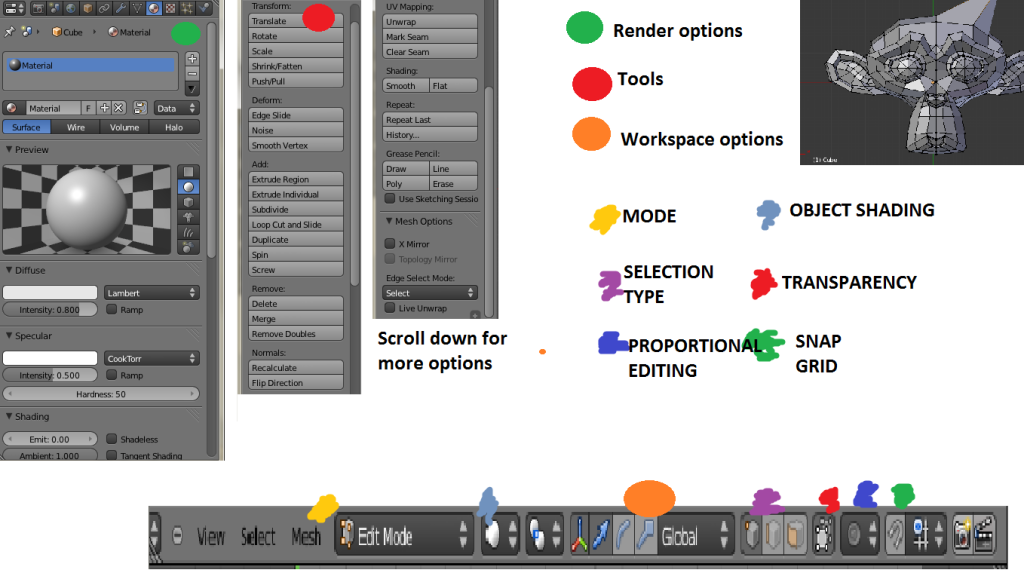 SELECTION (continued)
Try toggling between your three selection type buttons and right clicking on different sections of your part. Those buttons let you choose between face, line, and vertices selection. Look at your key commands. Too many of them are different selection options. They are however useful at different times, for different situations. Try them and see what they do. Press "a" to deselect your part to clear it, alternatively you can use it to select everything. Use middle mouse button click and hold to rotate around your part. You will see that you did not select the parts behind, outside your view. If you wish to change this, select the transparency button. You can also press "z" to change to wire frame mode.
Moving/Sizing/RotatingSelect a vertices and press "g" to grab it. Then press either x,y, or z to dictate the direction or move it randomly. Change your selection to face or line selection on the bottom toolbar. You can rotate parts of your object similar to the way you move them. Decide on a selection you want rotated and press "r". If you choose to constrain the rotation to an axis, it may act differently than you imagine it to. When you choose an axis it will rotate around it as if it were a wheel axis, it will not rotate towards that direction, but around it. Select a face and press "s". You can also size it proportionally, or in an x/y/z direction by using the arrows or typing x/y/z after you type "s".
Make sure that you sufficiently understand how to move and size your object before moving on. Create a rectangle! A triangle! An amoeba! You can always start over with your shape by deleting it (select everything with "a" and press "x" to delete it) and adding a new one, if you feel it is too hard to work with any more.
Extruding, edge loopsOkay great. With a single cube you have six faces and only so many lines and vertices to play with, now what?!
How does it end up looking like a fish? A spear? A purple cow? More vertices! Technically you can extrude any vertices, or line, but it is generally better to extrude just faces. Right click to select a face. Press "e" to extrude it, and "g" to move the extrusion. Now you have a new extension to make more stuff out of! Press "s" to size the new end face, and go to the opposite end face and do the same thing so you have a diamond. Pretty? Press "ctrl+r" to add an edge loop. Hover your mouse over your object and you will see a purplish line over top. Before you click, use your middle mouse button to scroll and change the number of lines to appear to three. For edge loops you need to left click twice to apply. Once to set the general area, and again to set the specific area you want to set it. Once you apply it you will have a new line of vertices around your object.
If you start over, can you figure out how to make a sword?
While you are editing your model, I advise that you routinely check your orthographic views (press 5 to go into orthographic mode, and press 1, 3, and 5 to see your different views) to make sure everything is lined up how you actually think it is. You can also hold down your middle mouse button to rotate your view around your model.
SculptingSculpting is an imprecise tool for adding details to your model and is suggest for more high poly models. You can switch to sculpt mode by toggling the mode on the bar below your work space. Use your tool bar to select different settings, and use your mouse like a brush to apply the tool to your object.
Mirroring your objectYou DON'T need to make sure your object is perfectly symmetrical with this nifty tool. You only need to draw half of it! Or if your object is symmetrical in more than one way, you may only need to draw a quarter of it. Mirroring an object will create another side of your object across either the x, y, or z axis. So make sure that it does not overlap the axis in order for it to work. A quick and simple way of adding a mirror, if you just started and did not move or edit your cube at all yet, go to edit mode to modify your cube. On the left tool bar, scroll down to enable x mirror. Some disadvantages with this, are that it does not work well with proportional editing, and that it does not copy added edge loops. A better way to do it is to start by cutting your object in half. On the render options toolbar, look at the top where there are small button tabs. Look for the button that depicts a wrench, or hold your middle mouse button down on the menu to scroll over for more options. Click to add modifier-> mirror. You should immediately see a copy of your object in the work space. If it is placed incorrectly, try check marking different axis options. You can enable clipping to disallow the two mirrors from moving apart. A disadvantage of this is if you accidentally move a vertices to the middle, it will be stuck there.
Finishing your objectAdding a MaterialExporting a .blend file with a material added to it will also create a .mat file. Some people dislike dealing with the extra file and prefer to add .png files in Feralheart instead. On the render options toolbar, look at the top at the different buttons. You want to select the button that looks like a circle. If you can't see the button on the bar, hold down your middle mouse button on the bar and drag to scroll through them. At the top of the new material screen, you can add, modify, and name new materials. Below that you will see your material on display on the shape of a sphere. You can change the shape it is visible on by clicking the different selections to the right. Select Diffuse to choose the colour on a colour wheel. You can check mark ramp in order to choose a mixture of colours in one material. Specular is the colour of light on your object. I do not advise you change this colour. Change the intensity below to effect how shiney your material looks. Go to edit mode and select the part of your object that you want the material to affect. If you select the material as well, there will then be an apply button, that wasn't there before.
Smoothing out your objectIf you are in object mode, right click on your object to select it then look to the tool panel to the left. Scroll down until you see the option "smooth" under "shading". The alternative and default option is "flat." If you are in edit mode select your entire object by pressing "a", or just select the parts that you want smooth.
Adding a subdivision surfaceIf you are unhappy with your object because it still isn't smooth enough, you can add a modifier which doubles the number of polygons on your object while smoothing it out. The top most part of the render option bar, there are buttons. Click the button that looks like a wrench. If you can't see it, hold down the middle mouse button on the bar to scroll for more options. Click to add modifier-> subdivision surface. There aren't many options, but you can play around with them until you are happy with the result you get.
Suggested tutorial videos:
---will add more detail later.


